
You can build a 3-by-6-foot cedar garden bed in one Saturday for about $30 in lumber. Corner joints are the headache: fence pickets warp and knot, so the seams will not sit flush no matter how careful your cuts.
That gap is where most first builds fail, and why the 4×4 corner support and a trim piece matter more than the cap board that everyone notices first.
1. Cut Cedar Fence Pickets to Size

Fence pickets run 5.5 inches wide by 6 feet long, and they cost around $4 each, sometimes as low as $3. Six pickets build a 3×6 foot bed, which is the size I would start with.
- Cut about an inch off the top of each picket to remove the dog-ear. A miter saw makes this quick, but a circular saw and a speed square work fine too. The flat top gives you a clean line when the bed is assembled.
- Cut two of the six pickets in half. At 6 feet to start, you end up with four 3-foot boards for the shorter sides. I would measure and cut one, then use it as a template for the rest so the lengths match exactly.
2. Assemble the Sides
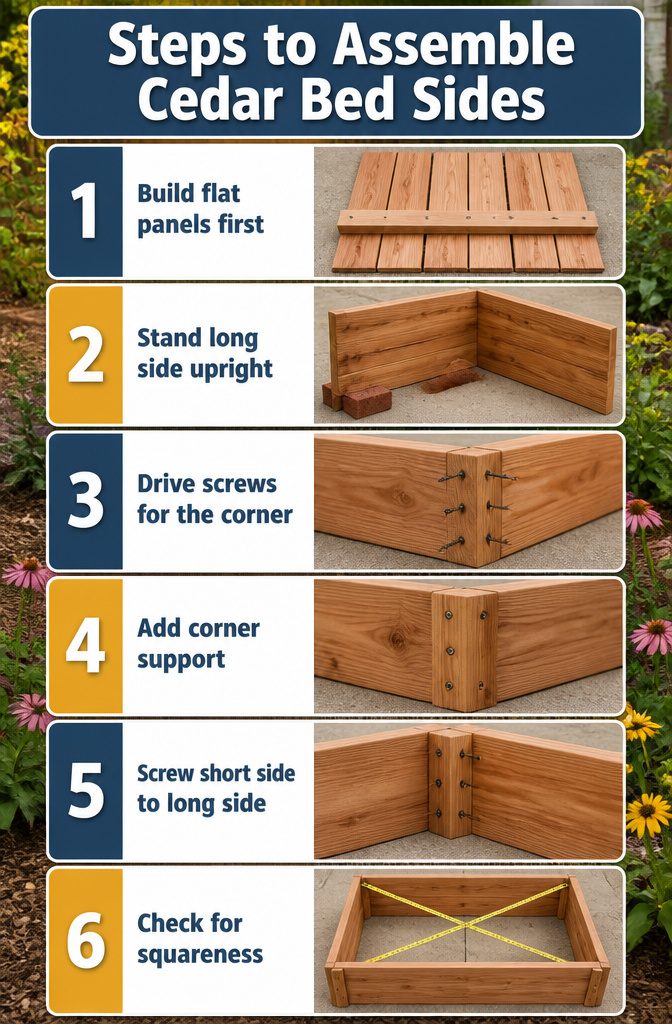
The cut fence pickets are what you actually see once the bed is built, but they need something sturdier behind them to keep the box square over seasons of wet soil and settling.
That is where 2×2 or 2×4 support beams come in.
- Build each wall as a flat panel first. Lay the long pickets side by side, then set a 2×2 or 2×4 across them perpendicular to the slats, roughly centered, and fasten it through from the face. Do this for all four sides so each one moves as a single piece when you stand it up.
- Stand one long side upright and brace it with whatever you have on hand, bricks or spare boxes work fine. Hold the short side perpendicular to it so the end of the long side meets the face of the short side, forming an L.
- Drive four screws through the long side into the end of the short side, tightening each a little at a time so the corner pulls together evenly. Knots and slight warp in fence-grade cedar mean the joint may not sit perfectly flush. That is acceptable for a garden box; trim will hide it later.
- Lay a 2×2 corner support over the outside of the joint and drive three screws through it. Four is overkill; three holds just as well and saves a few cents per corner.
- Add three more screws from the short side into the long side, through the end grain where no pilot holes exist. Once the long side is anchored, the deck screws bite in without pre-drilling.
- Repeat for the remaining corners, then check that the box is roughly square by measuring diagonally corner to corner before moving on.
3. Attach Corner Supports

- Cut your 4×4 cedar corner supports to the full height of your bed wall. For two stacked 5.5-inch fence pickets, that comes to 11 inches exactly. 2×2 is too light for corner supports; every source I found started there and sized up once the boards went on.
- Position one support in each corner before you join the sides. The 4×4 gives the cap board a solid landing later and resists the outward push of wet soil far better than a slimmer piece.
- Fasten through the fence pickets into the corner supports with 2-inch wood screws. Two screws per board end, driven from the outside face, keep the joint from racking when you move the box or as the wood seasons.
- Check for square as you go. A corner that drifts even slightly now turns into a gap that lets soil leak and stresses every joint once the bed is full.
4. Screw the Box Together

A drill and a circular saw are the two tools that make this build possible; without either one, the cuts and joins do not happen.
- Lay two 6-foot cedar fence pickets flat, one above the other, to form one long wall. Space three support boards evenly across them: one dead center, one at each end. Drive two 2-inch exterior wood screws through the pickets into each support. That is six screws per long side.
- Stand the first long side upright and butt a short side against its end. The joint wants even pressure, so run four screws about halfway in, then tighten each a little at a time so the corner closes flat.
- Add the corner support. A 2×2 on the outside of the joint takes three screws through pre-drilled holes; four is gilding the lily, and three hold fine once the wood swells. Then drive three more screws straight through the short side into the end of the long side, no pilot holes needed. The wood is soft enough.
- Repeat for the remaining corners. Knots and slight warp will throw some joints off, but garden beds hide a lot. Trim covers the gaps later.
5. Add Trim and Cap Boards

Trim and cap boards are optional, but they turn a functional box into something that looks finished from every angle.
Skip them if you need to shave cost or time off the build; the bed will still hold soil and plants without either.
- Corner trim covers the vertical seams where the sides meet and adds rigidity to the joints. I like to overlap the pieces so the first strip goes on the short side, then the second strip covers its edge on the long side. That staggered joint resists splitting better than butting two pieces together at the same corner. Nail the trim in place, steering clear of the screws already holding the box together.
- Cap boards sit across the top rim and give you a flat surface to sit or kneel on while weeding. Center each mitered piece and nail it to the corner supports and midpoint supports underneath. Nail the cap pieces to each other through their sides at the corners too. Solid cedar takes this well; if a board has a damaged or punky side that you have flipped face-down, the cap can destabilize over time. One person sitting or walking on it is fine, but two at once is pushing it on those weaker spots.
Trim and cap together add maybe an hour and the cost of a few extra pickets.
For a bed visible from a patio or walkway, that hour pays off. For a utilitarian row against a fence, I would put the money toward soil instead.
6. Place and Fill the Bed

- Set the bed where it will get full sun for vegetables or afternoon shade for leafy greens. Leave 3 feet between beds so you can kneel, wheel a cart, or run a mower without scraping cedar.
- Aim for 10–12 inches of depth. That height gives root vegetables room to grow downward and keeps the soil warm enough in spring without turning the bed into a retaining wall project.
- Fill the bottom 4 inches with a mix of compost and topsoil. I add a little sand here if the ground underneath drains slowly; the compost gives nutrients now, and the sand keeps water from sitting against roots.
- Top that with 4 inches of hardwood mulch. The two-layer approach, compost below and mulch above, mimics how soil builds in nature and cuts down on the watering you’ll do in July.
- Let the bed settle for a day or two before planting. The mulch will compact slightly, and you can top off any low spots without disturbing new seedlings.
Why Cedar Beats Treated Lumber

Cedar’s natural oils and acids repel the fungi and insects that rot other woods, so it lasts years longer than pine without any treatment at all.
That matters because treated lumber leaches fungicides, insecticides, and copper into soil, and that soil grows food you will eat. Organic standards simply do not allow it.
The price gap is real. Cedar boards cost more upfront, though cedar fence pickets trim that difference while keeping the same rot and bug resistance.
What I would skip is the middle-ground temptation: pressure-treated wood framed as a money saver that will outlast cedar. It might, but only by poisoning the bed it sits in.
Untreated wood touching soil is the rule I follow for anything that grows food.
Cedar satisfies that rule without asking you to rebuild every few seasons. Budget is the real question, not safety, and fence pickets from a lumberyard discount stack make cedar cheaper than the big-box sticker price suggests.
Fence Pickets or Cedar Boards

Cedar fence pickets run about $4 each, which is why they have become the go-to for budget builds.
The alternative is cedar boards from a lumberyard, thicker and cleaner but priced accordingly. One builder put together eight beds for roughly $350 using discounted 5/4 inch by 6 inch by 8 foot decking lumber; with hardware, the total edged closer to $400.
| Attribute | Cedar Fence Pickets | Cedar Boards / Decking Lumber |
|---|---|---|
| Typical cost | ~$4 per picket | Discounted ~$4 per board; standard pricing higher |
| Thickness | Thinner (common fence stock) | 5/4 inch (true 1 inch) or 2 inch |
| Condition | Consistent, retail grade | Discount lots may include cracks, holes |
| Best for | Tight budgets, quick weekend builds | Longer beds, cleaner corners, trim pieces |
Fence pickets make sense if you are building eight beds and need the total to land near that $350 mark.
Thickness is the cost: they flex more and the corners need extra care. I would order extra if I went the discount lumberyard route, since some boards arrive cracked or holed and you cannot cherry-pick them.
For the corner supports and trim, 2 x 2 cedar and 5/8 inch by 3.5 inch fence slats fill the gaps without blowing the budget.
If I were building just one or two showpiece beds, I would skip the pickets and pay for the heavier stock.
Bed Size and Access Rules

A raised bed wider than 4 feet wastes soil and seedlings, because the center becomes a dead zone you cannot weed or harvest without stepping in and compacting the bed.
Ten to twelve inches of depth gives the root space most vegetables actually use, and that range keeps the cedar cost reasonable without leaving carrots stunted.
I would not go shallower than 10 inches for anything except shallow-rooted greens, and even then I would rather have the 12 inches for water retention.
Length is where personal preference and yard shape take over. My own beds run 6 feet, a length dictated by the cedar fence posts I had on hand rather than any rule, and that flexibility is worth using.
What does matter is the path between beds: 3 feet is the minimum for wheelbarrow access and comfortable kneeling. Less than that, and a weekend of planting turns into a logistical headache of squeezed shoulders and spilled compost.
Raised Bed Payoffs

Cedar garden beds earn their keep in four ways, and the first is the one that saves the whole project from heavy clay or compacted yard soil.
- Improved drainage. Water moves through the bed instead of pooling at root level. Mix in a little sand with your compost and soil layer if your base still holds moisture longer than a day after rain.
- Soil you control from the start. You are filling the box yourself, so you skip years of amending whatever the builder left behind. A base of 4 inches of compost and soil, topped with 4 inches of hardwood mulch, gives most vegetables the depth they need and feeds the bed as the mulch breaks down.
- Fewer weeds. A thick mulch cap on top of that soil layer blocks most of what would otherwise sprout, and the defined edge makes the few survivors easy to spot.
- Physical boundaries. The frame keeps pets and kids from cutting across and compacting soil, and you can add a simple cage or covering over the top if rabbits or birds find your lettuce before you do.
What You Need to Start

Cedar fence pickets are the move here. Six per bed, running about six feet long, with that dog-eared top you’ll want to cut off for a clean edge so the pickets finish at 5’11".
For the frame, a standard 2×4 stud works fine untreated and saves money against cedar, though cedar 2x4s hold up longer if the budget stretches.
Corner posts cut from 2×2 cedar at 11" keep the boards from bowing once soil goes in; three per long side, one centered.
Screws need to be exterior-grade, two inches long, and I’d grab Deck-Mate with a star bit if the hardware aisle has them. They drive cleaner and strip less than Phillips heads.
A drill handles the assembly, and a circular saw or miter saw covers the cuts. A brad nailer with exterior galvanized nails speeds things up, but a hammer and stainless steel nails get it done slower for less cash.
Budget for One Weekend Build
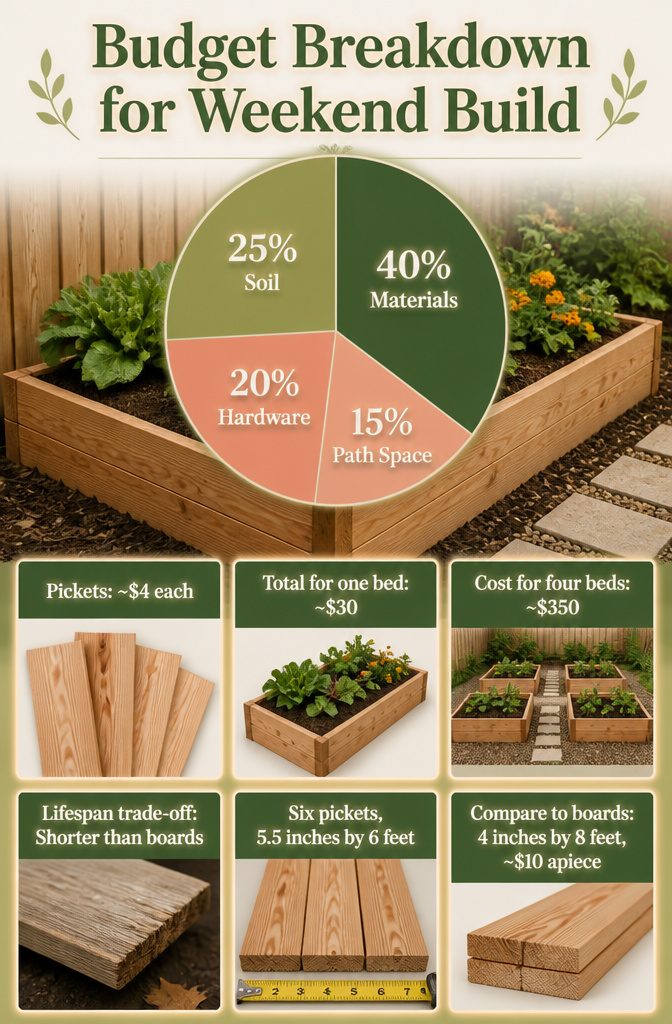
Cedar fence pickets run about $4 each, sometimes $3 on sale, and that price is what makes a weekend build possible.
Six pickets, each roughly 5.5 inches by 6 feet, get you a 3 by 6 foot bed for $24 in raw siding. Compare that to common cedar boards at 4 inches by 8 feet and roughly $10 apiece; the same six-board count lands near $60.
I would take the pickets every time for a first bed, even knowing the boards are thinner and will not last as long.
The full spend flexes with how many beds you want.
One planter is a $30 Saturday. A larger project, maybe four beds and some path space, can land around $350 once soil and hardware join the receipt.
Costs also shift by region and whatever the yard has in stock this week, so I would call ahead rather than plan to the dollar.
You give up some lifespan. Thinner pickets mean the cedar rots a little faster than it would in board form, and a few seasons in you may be replacing a side.
For my own yard, that still beats the upfront cost of full-dimension cedar, especially on a renter’s timeline or a first home where the garden layout might change.
Frequently Asked Questions
What kind of wood is best to use for a raised garden bed?
Cedar is the best choice for a raised garden bed because its natural oils make it resistant to rot and insects without any chemical treatment.
Fence pickets run about $4 each and work well for budget builds, while thicker cedar boards cost more but hold up longer. Either option beats treated lumber, which can leach fungicides, insecticides, and copper into your soil.
How deep should a raised garden bed be?
A raised garden bed should be 10 to 12 inches deep. That height gives root vegetables room to grow downward and keeps soil warm enough in spring without turning the project into a retaining wall build.
I would not go shallower than 10 inches for anything except shallow-rooted greens, and even then 12 inches helps with water retention.
What is pressure-treated wood and is it recommended for raised garden beds?
Pressure-treated wood has had air removed and replaced with preservative agents to resist rot and insects, but it is not recommended for garden beds.
The fungicides, insecticides, and copper in treated lumber leach into soil, and organic standards do not allow it. Untreated cedar is the rule I follow for anything that grows food.
Is cedar good for a garden bed?
Cedar is excellent for garden beds because its natural oils and acids repel the fungi and insects that rot other woods, so it lasts years longer than pine without any treatment.
Cedar fence pickets trim the cost difference against cheaper woods while keeping the same rot and bug resistance. The upfront price is higher, but the safety and lifespan justify it.
How long will a cedar raised garden bed last?
A cedar raised garden bed should last a decade or more without any sealing, thanks to the wood’s natural rot and insect resistance.
Thinner fence pickets may rot slightly faster than full-dimension cedar boards, but they still outlast untreated pine by years. You can extend life further with a food-grade sealer or the Japanese Shou Sugi Ban charring method, though neither is necessary.
What type of cedar is best for a raised bed?
Fence-grade cedar pickets are the most practical choice for most builds, running about $4 each and sized at 5.5 inches wide by 6 feet long.
For corner supports, 4×4 cedar resists the outward push of wet soil far better than 2×2, and 2×4 or 2×2 cedar supports behind the pickets keep the box square over seasons of wet soil and settling.
If the budget stretches, thicker 5/4 or 2-inch cedar boards from a lumberyard give cleaner corners and longer life.
Which is better for a raised garden bed, redwood or cedar?
Redwood shares similar natural durability, but cedar’s lower cost and easier availability through retail fence pickets make it the practical choice for most United States builders.
Either wood beats treated lumber for food growing; the decision between them usually comes down to local pricing and supply.