

A finished paver patio runs about $6.73 per square foot and eats two solid weekends, but most DIY builds fail long before the pavers go down.
The base is where people rush: six inches of compacted crushed stone, wet and plate-compacted in lifts, sounds excessive until you are relaying sunken pavers the following spring.
1. Planning the Patio

Start with how the patio will be used. A dining table needs a flat, even surface; a lounge area with Adirondack chairs can handle more variation.
If an outdoor kitchen or fire pit is even a possibility in the next few years, plan the footprint now. Moving pavers later is a project you will not want to repeat.
Location drives material choice as much as budget does.
Grand Flagstone looks organic, but its uneven surface wobbles a dining chair. For a table-and-chair setup, I would pick something machine-cut with consistent thickness.
Mark the dimensions with stakes and string first, then walk the furniture inside those lines. Most people guess too small.
Slope matters more than most first-timers expect. The patio needs a slope of 1/4 inch per foot running away from the house, or water will pool against the foundation.
Measure from the house wall to the far edge, multiply that length in feet by 0.25, and that is your total drop. For a 13.5-foot run, that works out to 3 3/8 inches.
Set one stake at the house corner, account for paver thickness plus sand bed (about 2 1/4 inches up from ground level), run a level string to the far stake, then drop the string by your calculated slope before marking the lower height.
Permit requirements split on scope.
A basic paver patio on grade often slides under the threshold, but retaining walls, gas lines, or electrical work changes the calculation. A quick call to your local building department costs nothing and saves a demolition order later.
2. Site Preparation

Stripping out grass and topsoil is the part most people rush, and it costs them later.
Anything that decomposes, leaves, roots, or sod, has to come out completely. As it breaks down, it leaves voids that let pavers sink and shift, so the time spent here is cheaper than relaying the surface in two years.
For a small patio, a sharp spade and a wheelbarrow do the job; a rented skid-steer justifies itself fast on anything over about 150 square feet.
Excavate to the full depth your paver system needs, not to a generic number. That means the paver thickness plus bedding layer plus compacted base, which typically runs 6 to 8 inches total.
Dig first and figure out your layers afterward, and you will be back with a shovel doing it twice. While the soil is open, watch how water moves across the site.
A patio that traps runoff against a foundation wall is a patio that fails, so grade for gentle slope away from the house, compact the exposed soil with a hand tamper, and only then bring in base material.
3. Building the Base
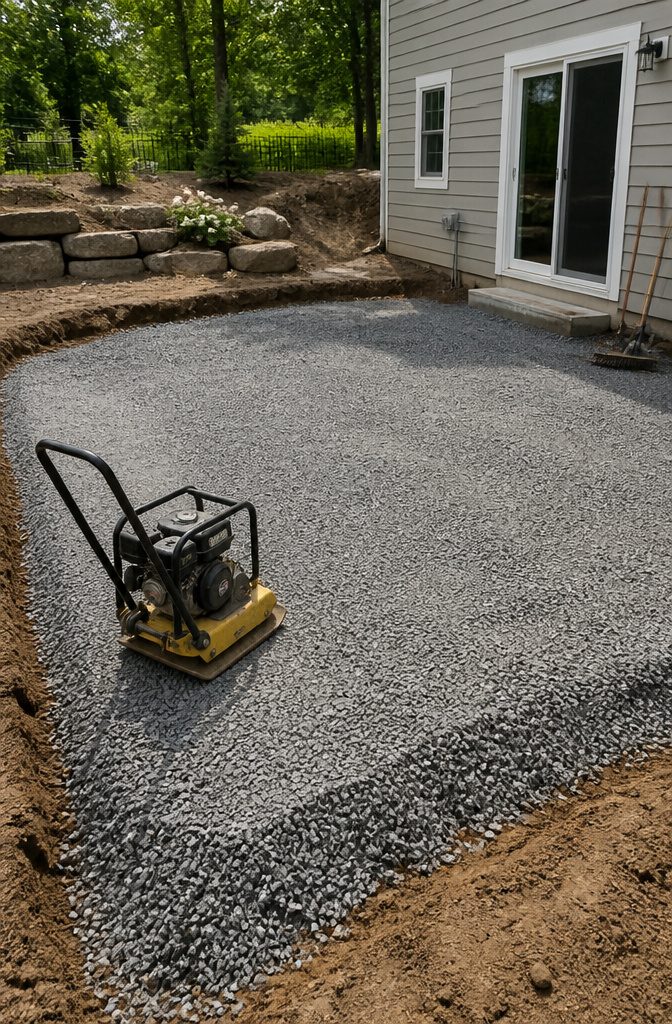
The base is where most DIY patios fail, and the fix is straightforward: 6 inches of compacted ¾-inch crushed stone, extending 6 inches past every edge of your finished surface.
I build this in three lifts of roughly 2 inches each, running a vibrating plate compactor over each one, wetting it down, and compacting again before the next lift goes on.
That extra width beyond the perimeter matters more than it looks; it keeps the edge courses from settling and spreading over the first hard freeze.
If I am being honest, this is the step where rushing costs you everything. Once the base is in and the sand goes down, you cannot correct a low spot or a slope that runs the wrong way.
I check with a straight 2×4 and a level after every lift, not at the end. The stone should feel almost concrete-hard underfoot when you are done.
Some people ask about Gator Base or other panel systems as a shortcut, and they exist, but for a standard backyard project on real soil, I still reach for the crushed stone method.
It is less expensive, more forgiving of minor grading errors, and the material is available at any landscape supply yard without a special order.
4. Screeding the Sand

The sand layer is where patience pays off. I use 1 inch of coarse bedding sand spread over the compacted crushed stone, and this is the last chance to fix anything before the pavers go down.
Two pieces of 1-inch outside-diameter steel pipe make the job straightforward.
Lay them on the base, check that they sit level with each other using a 2×4 across them, then drag that same 2×4 along the pipes from one end to the other.
The sand smooths out at exactly the pipe height. Any pockets that form get filled and rescraped; there is no shortcut here, because the pavers will telegraph every bump underneath.
Once the surface is uniform, lift the pipes out carefully so you do not disturb what you just finished.
After that, stay off it. Footprints in the bedding layer become permanent dips in the finished patio, and there is no correcting them without pulling pavers back up.
5. Laying Pavers

Laying pavers is where the patio stops looking like a construction site and starts looking like the thing you planned. Most concrete pavers run about 1 3/4 inches thick, which gives you enough mass to seat firmly into the sand without rocking.
Drop them straight down; sliding them drags sand out of place and leaves you with a wobble that only gets worse after rain.
Pattern choice is where I get opinionated. A basketweave looks great on paper but can leave slight gaps since two standard pavers rarely form a perfect square.
I would still pick it for a small courtyard where the eye catches the texture, but for a first project, a running bond or simple stack keeps alignment honest and moves faster.
If the manufacturer includes a pattern guide, use it, especially with multi-size kits where color clusters can sneak up on you.
A string line squared off the house keeps your courses straight, and stepping back every few feet catches drift before it compounds.
The grooves left by screeding poles need a quick pass with a trowel and fresh sand before you bridge them. Take the extra thirty seconds; a hollow spot under one paver becomes a low spot under ten.
6. Finishing Touches

Edge restraints do the quiet work of keeping a patio together. Without them, pavers drift laterally over freeze-thaw cycles and the bedding sand washes out from underneath.
I install restraint directly on the compacted base, not on top of the sand layer, with the top edge sitting about a half-inch below the paver surface so it disappears under soil or mulch.
The CMHA treats this component as essential, not optional, and I agree: the labor up to this point is too much to risk on a floating perimeter.
Polymeric sand fills the joints and locks everything in place once it cures.
I pour it in small piles, sweep it into the gaps with a push broom, and keep adding until the sand sits roughly 1/8 inch below the chamfer on each paver.
A light hand-tamping helps it settle fully before the final sweep. Check the weather before you start; rain on unset sand turns the surface into a hazy, polymer-stained mess that does not brush off.
Water activates the binding agents. I work in 50 square foot sections and run a hose for 60 seconds per section, just enough to dampen without flooding the joints or washing sand out.
One pass, let it dry 24 hours, and the patio is set. The sand hardens enough to block most weed growth while still letting water drain through, which is more than regular joint sand ever managed in my experience.
Materials for Patios

Concrete gives you two paths, and the choice depends on how much weekend you have. Precast concrete pavers come in gray, muted red, yellow, brown, black, or green, and you can set them solo without waiting for a truck.
Pouring your own slab lets you tint and texture the surface, but that smooth finish is harder to achieve without experience. For a first patio, I’d take the precast route and skip the curing anxiety.
Gravel is the cheapest way to cover ground, and you can spread it in an afternoon.
The look is informal, which works for a garden path or fire pit ring, but it migrates underfoot and you’ll be raking it back into place after every rain.
Bricks and pavers sit on a base layer topped with stone dust, and polymeric sand fills the joints between them. That sand locks everything together once it sets, so weeds stay out and the surface stays level.
Bricks come in red, yellow, or gray clay, while concrete pavers give you more color range. A herringbone pattern helps lock the bricks in place and adds visual interest without extra cost.
Edge restraints go around the perimeter on top of the compacted base, held down with spikes.
They resist lateral movement and keep the joint sand from washing out. I’d use them on any paver patio; without them, the edges creep over a season or two.
Mortared brick and interlocking pavers are alternatives if you want a more permanent surface, but for a weekend project with rental tools, the dry-laid system with polymeric sand wins.
Tools You Need

The right tools keep a patio flat and level for years, not months. You can rent what you do not own, and for most weekend projects, renting beats buying.
- A plate compactor is non-negotiable for the gravel base and again after the pavers go down. Hand tamping a 10-by-12-foot area is possible, but the compaction will not hold. Rent one for a half day.
- A long level or laser level sets the slope away from the house, and screed rails with a screed board level the bedding sand in one pull.
- Shovels, a landscape rake, and a wheelbarrow handle excavation and moving material. A rubber mallet beds the pavers without chipping them.
- A push broom sweeps joint sand into the gaps after the final compaction.
- For cuts, you will need a wet saw with a masonry blade or a paver splitter. The exact tool depends on your paver material and the manufacturer’s requirements, so check those before renting.
Wear eye and hearing protection when cutting or compacting. The paver type determines the blade and the compaction method, not the other way around.
Cost and Durability Compared
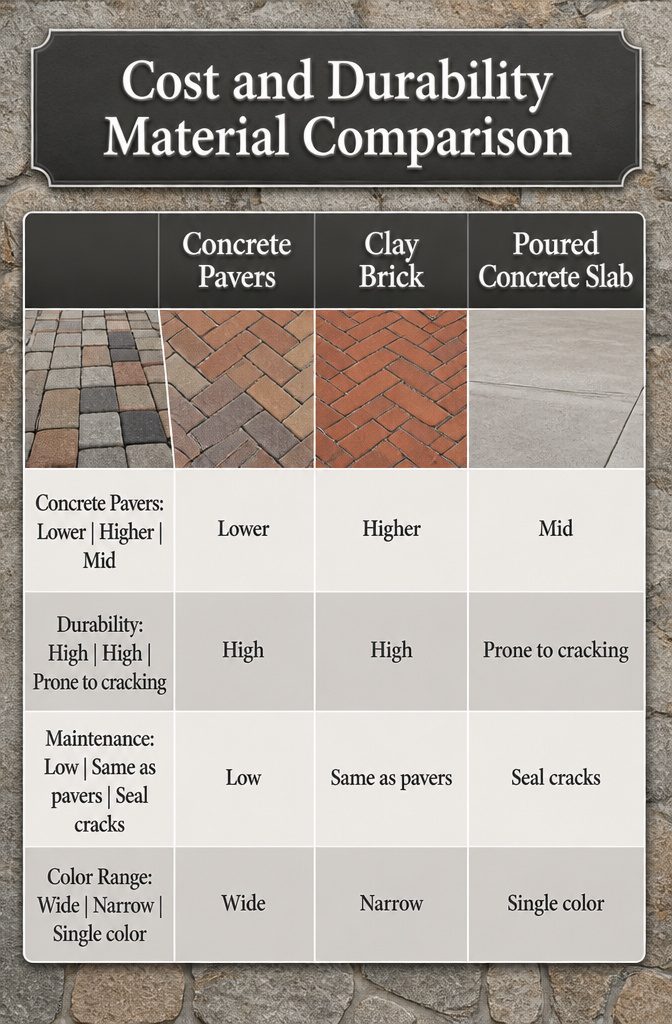
Concrete pavers hit a practical balance for most DIY builds: cheaper than natural stone or brick, tough enough to last, and available in enough colors and patterns to avoid the poured-concrete look.
A 208-square-foot patio runs roughly $6.73 per square foot in concrete pavers, which puts the total material bill near $1,400.
That is well under the $2,000-plus estimate for a plain concrete slab that will crack eventually and gives you no pattern at all.
Clay brick costs more and limits you to red, yellow, or gray, though a herringbone layout locks the joints tight.
Natural stone is what I would skip for a weekend project: the price jumps fast, and the irregular edges slow every placement.
| Material | Relative Cost | Durability | Maintenance | Color/Pattern Range |
|---|---|---|---|---|
| Concrete pavers | Lower | High; resists cracking | Sweep; refill joints with polymeric sand | Wide: gray, red, yellow, brown, black, green; basket-weave, herringbone, running bond |
| Clay brick | Higher | High | Same as pavers | Narrow: red, yellow, gray; herringbone shines |
| Poured concrete slab | Mid | Prone to cracking over time | Seal for shine; patch cracks | Single color, no pattern |
For a real budget and a two-day timeline, I would pick concrete pavers in a basket-weave or herringbone pattern.
The surface stays smooth enough to sweep clean, the joints let water drain, and if one paver settles later you lift and relevel it rather than jackhammering a slab.
Drainage and Slope

Water needs somewhere to go, and a flat patio turns into a pond the first time it rains.
I start every build by figuring out what the yard already does on its own. String lines and stakes show the story fast: tie level, measure the drop, and you see whether nature is helping or working against you.
The slope to aim for is 1/4 inch per foot of patio length running away from the house. On a 13.5-foot run, that works out to 3 3/8 inches of total drop from the wall to the outer edge.
I mark the stake at the house for paver thickness plus sand, usually 2 1/4 inches up from grade, then set the far stake 3 3/8 inches below where the level string hits. That gives the plane the finished surface will follow.
Some sites need more than slope. If water pools where the patio will sit or moves toward the foundation, drainage improvements have to happen before a single paver goes down.
Options run from channel drains and buried pipe to a dry well, depending on how the yard sheds water. I would rather spend a day on hidden drainage than watch a finished patio heave after the first freeze-thaw cycle.
Frequently Asked Questions
How deep should the base be for a patio?
The base needs a minimum of 6 inches of compacted 3/4-inch crushed stone, extending 6 inches past every edge of the finished surface.
Build it in three lifts of roughly 2 inches each, running a vibrating plate compactor over each one and wetting it down before the next lift.
Once the sand goes down, you cannot correct a low spot or wrong-way slope, so check with a straight 2×4 and level after every lift.
What materials are best for building a patio?
Concrete pavers, gravel, and clay brick each suit different budgets and uses.
Concrete pavers offer the widest color range and patterns at the lowest cost; gravel covers ground fast but migrates underfoot; brick limits you to red, yellow, or gray but locks tight in a herringbone pattern.
For a first project, precast concrete pavers in a running bond or herringbone pattern give the most durability per dollar.
How do I ensure proper drainage for my patio?
Slope the finished surface 1/4 inch per foot running away from the house, which keeps water from pooling against the foundation.
Measure from the house wall to the far edge, multiply that length in feet by 0.25, and set your total drop accordingly.
If the yard already traps runoff or moves water toward the foundation, install channel drains, buried pipe, or a dry well before laying a single paver.
What is the cheapest way to build a back patio?
Gravel is the cheapest way to cover ground, and you can spread it in an afternoon. The tradeoff is that it migrates underfoot and needs raking back into place after every rain.
For a more stable surface that still costs less than natural stone or poured concrete, a DIY concrete paver patio runs about $6.73 per square foot in materials.
How much does it cost to build a patio?
A 208-square-foot concrete paver patio costs roughly $1,400 in materials, or about $6.73 per square foot.
That is well under the $2,000-plus estimate for a plain concrete slab that will eventually crack. Natural stone costs a lot more and slows placement with its irregular edges.
How do you prepare the ground for pavers?
Strip out all grass, topsoil, roots, and anything that decomposes, because organic material leaves voids that let pavers sink and shift later.
Excavate to the full depth your paver system needs: paver thickness plus 1 inch of bedding sand plus 6 to 8 inches of compacted base.
Grade for gentle slope away from the house, compact the exposed soil with a hand tamper, and only then bring in base material.
How big of a patio should I build?
Mark the dimensions with stakes and string first, then walk your furniture inside those lines before committing. Most people guess too small.
A dining table needs a flat, even surface and enough room to pull chairs back; if an outdoor kitchen or fire pit is possible in the next few years, plan the footprint now because moving pavers later is a project you will not want to repeat.