
You can build a modern outdoor chair in one weekend for about $50 in lumber, with clean lines that look intentional on a patio without eating your whole Saturday.
The stage most beginners get wrong is the cushion sizing: buy the 25×25 inch seat and 25×21 inch back cushions before you cut a single board, or you will rebuild the frame to close a gap that catches your leg.
The design uses standard 2×4 and 2×6 pine, pocket-hole joinery, and a Kreg Jig to hide every fastener.
How to Build a DIY Outdoor Chair
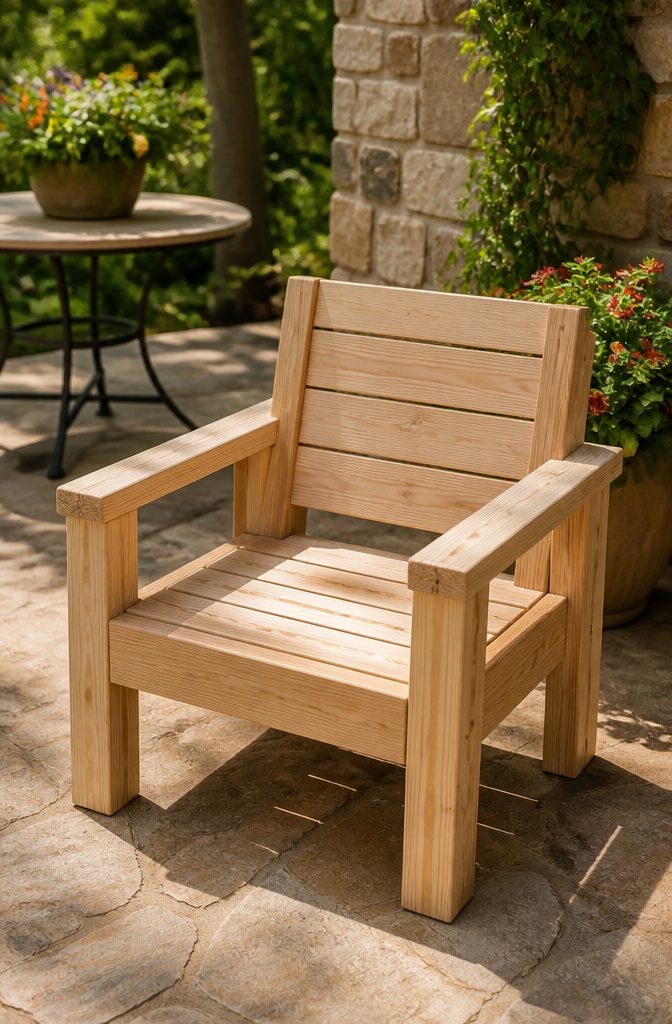
A modern outdoor chair with clean lines is easier to build than most furniture projects, and you end up with a piece that looks intentional on a patio or balcony without eating your whole weekend.
The design I would follow uses standard 2×4 and 2×6 lumber, pocket-hole joinery, and a structure sized for 25×25 inch bottom cushions with 25×21 inch backs, the dimensions most retailers stock.
Two sources put materials at about $50 per chair when you build with untreated pine, which keeps the budget honest for a first project. Pine is the economical choice, though you will need to seal it well for outdoor use.
I would buy cushions before cutting any wood; if you already own a set, check whether it matches the standard sizes or whether you need to adjust the frame.
The original plans come from Ana White’s modern outdoor chair, and they have been modified enough times now that the core measurements are proven.
Expect one full weekend from lumber haul to final coat of finish, with most of that time spent on sanding and drying between steps rather than on complex joinery.
1. Cut Lumber to Size
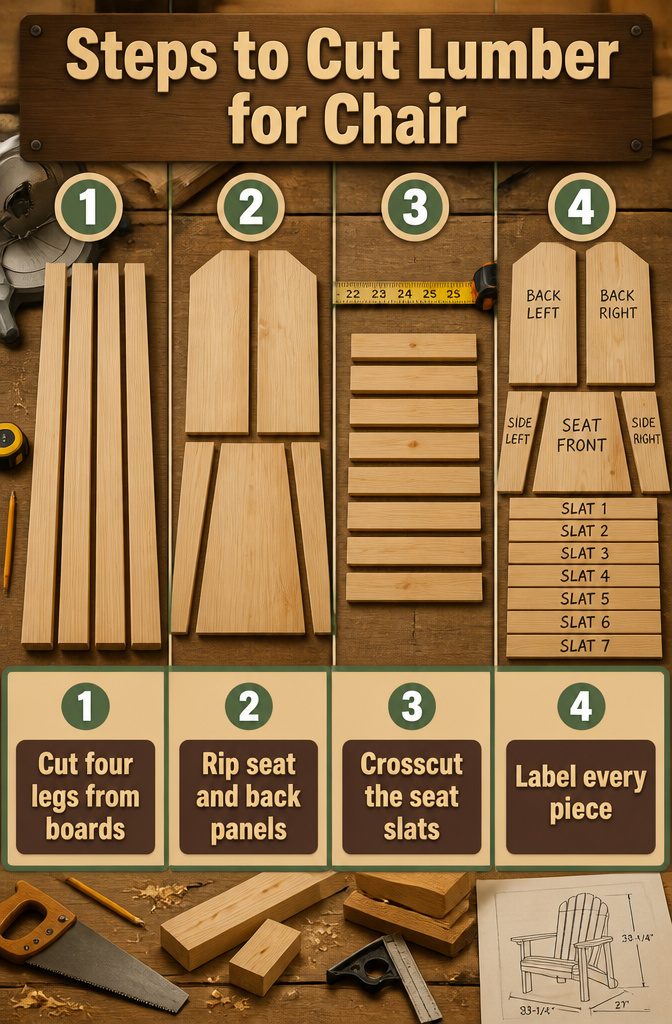
- Cut four legs from 1 1/8 x 3 1/2 boards to the length your plan specifies; these carry the full height of the chair, which finishes at 35-1/4 inches tall overall.
- Rip or cut the seat and back panels next. The back panel needs angled edges for a comfortable recline, and the front seat panel sits between matching angled side pieces cut from the same 1 1/8 x 3 1/2 stock. A 10-degree cut on one end and a 15-degree cut on the other are the angles that typically govern this geometry.
- Crosscut the seat slats last. These usually run 22–25 inches depending on how wide you want the finished seat; the overall chair width is 27 inches and the depth is 33-1/4 inches, so slat length lands somewhere inside that range based on how much frame you leave exposed.
- Label every piece with its final position before you move on. Legs, back supports, and seat slats all look identical at a glance, and one wrong cut here costs you material and an hour of re-cutting.
2. Drill Pocket Holes

Pocket holes are what keep this chair from looking like a weekend project that fell apart by Labor Day.
A Kreg Jig drills each hole at an angle so the screw enters from the back or underside of the joint, which means no visible fasteners on the faces you actually see.
- Set your Kreg Jig for 1 1/2-inch pocket holes. This is the standard depth for the 2× lumber used throughout this build, and the measurement that determines how the screw grips without blowing through the opposite face.
- Clamp each leg piece and drill one pocket hole at a single end. These holes will later receive 2 1/2-inch pocket hole screws that pull the leg tight into the arm assembly with wood glue.
- Repeat for the front stretcher, but drill pocket holes at both ends instead of one. The double connection is what keeps the front frame from racking sideways when someone sits down hard.
- Run a test hole on scrap first. If the collar depth looks off or the bit chatters, recalibrate before you touch your finished pieces. A misaligned pocket hole is not something you fill and hide on outdoor furniture.
3. Assemble the Legs
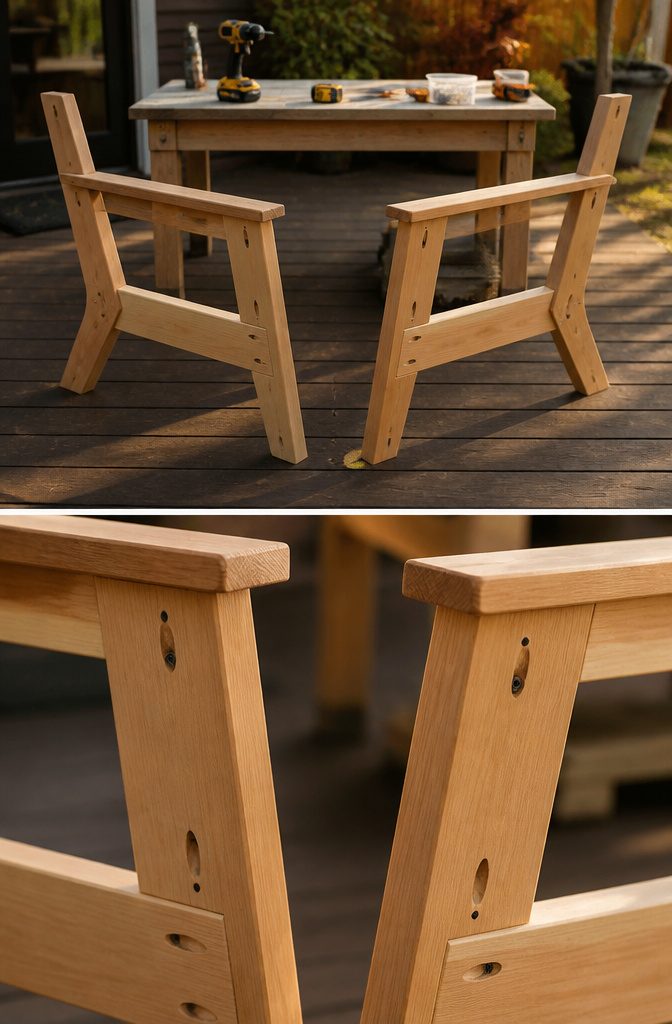
Two matching leg assemblies form the sides of the chair, and this is where the whole build stands or wobbles. I build them as mirror images, not identical, so the pocket holes face inward and stay hidden.
- Drill 1 1/2-inch pocket holes at one end of each leg piece, then attach the legs to the arm pieces with 2 1/2-inch pocket hole screws and wood glue. Build two of these arm-leg assemblies.
- Cut the side runners and drill 1 1/2-inch pocket holes at both ends. Attach them between the legs with 2 1/2-inch pocket hole screws and wood glue. These set the chair’s width and keep the legs from splaying.
- Cut the bottom runners, drill 1 1/2-inch pocket holes at both ends, and attach them at the bottom of each side assembly with 2 1/2-inch pocket hole screws and wood glue. The bottom runners sit low enough to lift the seat slats off the ground.
- Attach the back runner to the inside of the arm assemblies with 2 1/2-inch pocket hole screws and wood glue, then do the same for the front runner. These runners will carry the seat frame later.
If you do not own a pocket hole jig, a countersunk screw through the face works.
The plug over the screw head takes extra time and never quite matches, which is why I would borrow or buy the Kreg before starting.
4. Attach Seat Supports

- Set the front and back seat supports between the leg assemblies so the 7-degree bevel on each support sits flush against the bottom of the leg slant, right where the slant meets the leg front.
- Drive 2.5" Kreg screws through the supports into the legs, keeping the top edge of every support 14 inches from the bottom of the leg. This height is what the seat slats will eventually rest on.
- Check that the outside width of the frame reads 27 inches once both supports are tight. The back support and front support should be parallel, or the slats will rock when you sit.
- If the slat thickness doesn’t match the space above the supports, shift them slightly now. Raising or lowering by a quarter inch is easier before the glue sets than after the seat is half-built.
5. Build the Back Frame

- Cut the back slats to length and drill 1 1/2″ pocket holes in the short boards. Attach them to the long boards with 2 1/2″ pocket hole screws and wood glue to build the backrest frame as a separate unit.
- Rest the completed back assembly on the cleats, keeping it flush with the 5° angle already cut into them. This slant is what turns the chair from a stiff dining seat into something you can actually lounge in; I would not skip it.
- Drive 2 1/2″ wood screws up through the bottom of the cleats into the back frame. Then drive 2 1/2″ wood screws from the back of the back stretcher into the back for a second anchor point.
- Two ways to secure the sides: pocket holes through 2×2 supports with 2 1/2″ Kreg screws, or direct screws into the arms. The pocket-hole route hides the fasteners but costs time; exposed screws through the arms with 3 1/2″ screws is faster and just as solid for a first build. I would pick the faster option.
6. Attach Seat Slats

- Lay your seat slats across the frame cleats and set the two end slats first. Everything else keys off these two, so take a minute to square them with the front and back edges.
- Space the slats 3/8 inch apart for a balanced look that still sheds water. A scrap of 1×3 or any cutoff from your pile works as a spacer; let it ride between slats as you move across the frame. Tighter gaps look cleaner but trap rainwater, and this surface takes both your weight and the cushion.
- Fasten each slat with a 2 1/2-inch screw at both ends, plus wood glue on the cleats if you have it. The screws land into the cleats beneath, not the open frame, so predrill to keep the ends from splitting.
- Stand back and check the gaps before the glue sets. Consistent spacing reads as intentional; wandering gaps read as rushed, and this is the part your eye returns to every time you walk up to the chair.
7. Sand and Finish

- Sand every surface smooth, working from 120-grit up to 220-grit. Pay attention to the seat slats and back frame where splinters matter most. The chair will live outside, and rough wood traps moisture that leads to rot.
- Fill screw holes with wood filler if you want a cleaner look, then sand again once it cures. I skip this on rustic builds, but it takes five minutes and the stain goes on more evenly.
- Choose your finish based on what you have on hand and how much weather hits the chair. Spar Urethane holds up against rain and sun better than standard polyurethane; Helmsman’s version in satin is what I’d reach for. Minwax Water-Based Semi-Transparent Stain in Weathered Oak is another solid option if you want color plus protection in one coat.
- Apply two thin coats of sealer, sanding lightly between them with 320-grit. Thin coats dry faster and run less. Let the final coat cure fully before the chair sees its first morning dew, usually 24 to 48 hours depending on humidity.
8. Fit the Cushions

- Place your cushions and take a seat
Buy the cushions before you cut a single board.
Standard sizes run 25×25 inches for the seat and 25×21 inches for the back, but even half an inch off means a gap that catches your leg or a cushion that rides up the frame.
I would measure the actual cushion in the store, tags be damned, then build to that real dimension.
If you already own cushions, as I would guess many weekend builders do, measure them and adjust the seat depth and back angle to match.
The chair frame has no give; the cushion is what yields, and a poor fit turns a finished build into a wobbly perch.
This is the step where patience at the start pays off in something you actually want to sit in.
Tools You Need

A miter saw handles every crosscut in this build, and it is the one tool worth borrowing or buying if you do not own it already.
The cuts are repetitive, and a miter saw keeps them square and identical in a way a circular saw struggles to match.
A drill drives the screws, and a Kreg Jig drills the pocket holes that hide the fasteners and hold the frame together.
You will also want wood glue at every joint; it adds strength the screws alone do not provide. The bit sizes that matter are 1/8 inch, 3/8 inch, and a 3/8 inch countersink.
A table saw can rip stock to width if you are comfortable with it, but the plans work without one. Clamps, a tape measure, and a speed square round out the kit.
Pine vs Cedar vs PVC
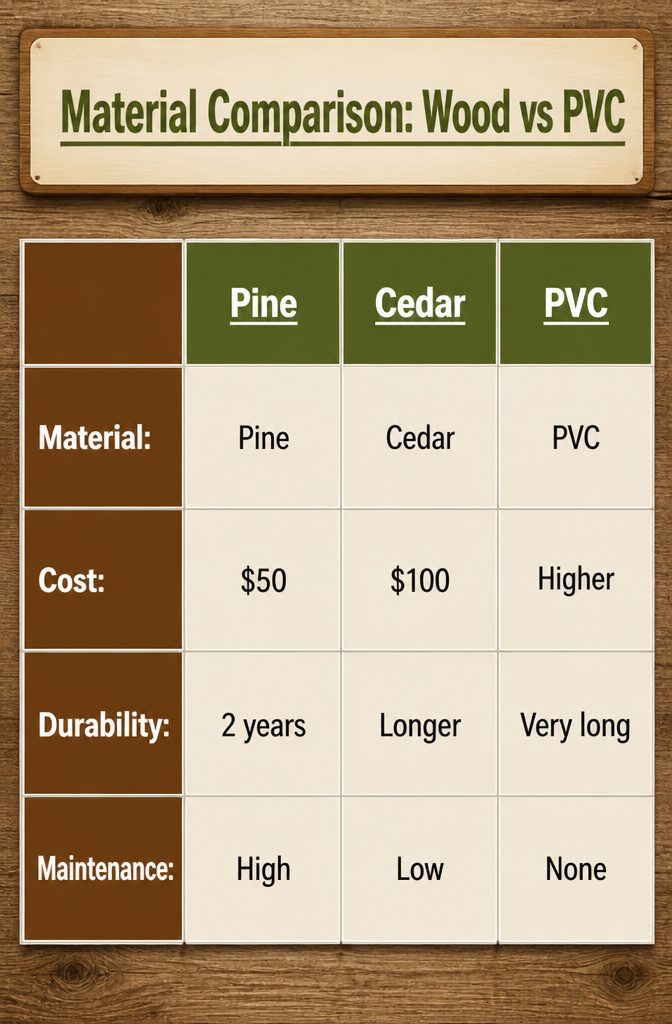
Untreated pine runs about $50 per chair in materials and takes stain well, but it will gray and crack within a season or two without a proper outdoor finish.
Spar urethane is the coating that actually holds up; plan on reapplying it every couple of years.
Cedar costs roughly double but carries its own natural oils that repel moisture and insects, which means less maintenance and a longer life before the wood starts to fail.
For a chair I plan to keep on a covered porch and replace in five years, pine still makes sense. For anything sitting in full sun and rain, cedar is where I would put my money.
PVC enters the conversation as a third path.
The boards are one inch thick, sold at home centers for exterior trim, with one smooth face and one grained face that lets you choose which side shows. It does not rot, splinter, or need refinishing.
The trade-off is in the tooling: specialized blades for cleaner cuts, composite screws with their own driver bit, and plugs to hide the fastener holes. The material itself costs more than pine, and the hardware adds up.
Cellular PVC is a great material for outdoor furniture. It will last forever without needing sanding or re-finishing.
That durability is real, but PVC also feels and sits like plastic, which matters on a piece of furniture.
My own pick is cedar for anything permanent, pine for a quick seasonal build, and PVC only if I were making chairs for a rental property where maintenance will not happen.
Cushion Sizes That Actually Fit
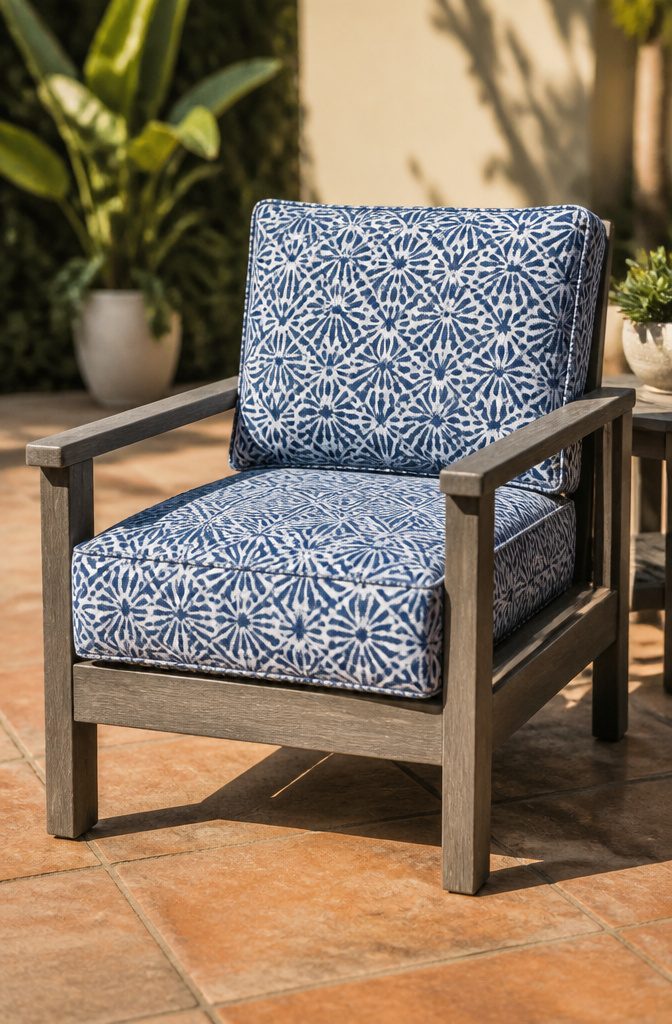
The most expensive mistake in a diy outdoor chair build is finishing the frame before you own the cushion.
Standard outdoor cushions come in three sizes that actually matter: 24×24 inches, 25×25 inches, and 25×21 inches. Build to the wrong one and you are either cutting new lumber or living with a gap that catches rain.
If the cushion is 24×24, the seat width should run about a quarter inch narrower so the cushion stays put in wind.
Depth gets the same treatment, with the cushion overhanging the front edge by roughly a quarter inch so the backs of your legs rest on fabric, not wood.
For a 25×25 bottom paired with a 25×21 back, the frame dimensions shift to match; the plans need that cushion in hand before the first cut.
Measuring is simple once the chair is built.
Width runs inside edge to inside edge of the seat frame. Depth goes from the back of the seat box to the front rail.
Match those two numbers to the cushion tag, not the other way around. I would rather spend an afternoon tracking down the right 25×25 than spend a Saturday rebuilding a seat box because I assumed.
Design Styles to Consider
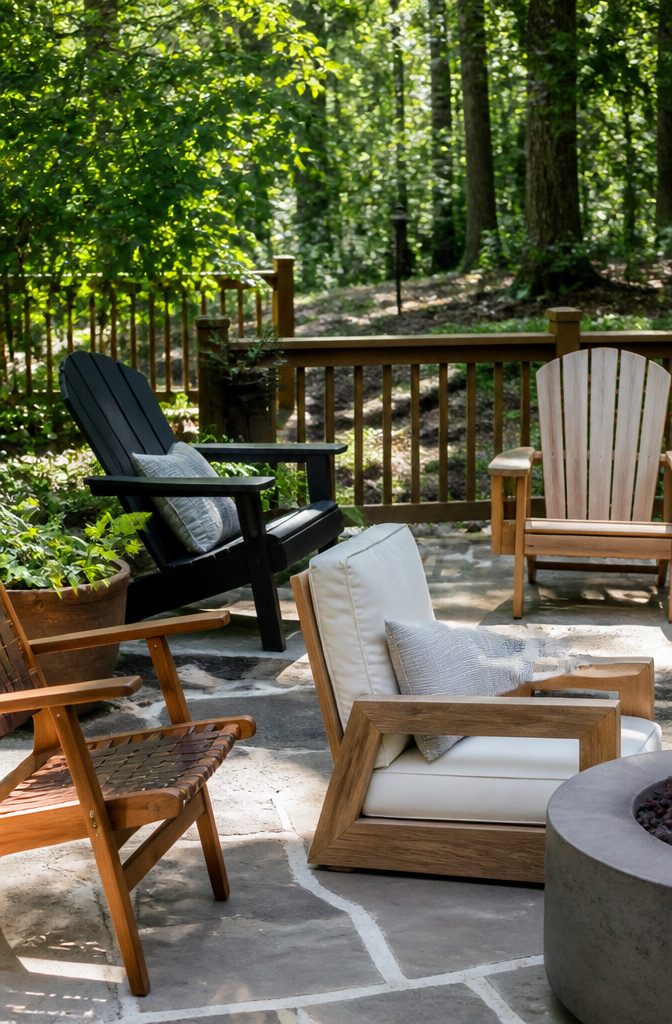
The five main chair types each suit a different space and skill level.
- Adirondack chairs carry wide armrests and a steeply slanted back. They read classic and demand more angled cuts, so the build takes longer than a straight-line design.
- Modern chairs run on clean lines and right angles. The Ana White plans I see referenced use 2×4 legs at 22-1/4 inches and 2×6 side slats at 25-1/2 inches, all butt joints and countersunk screws. A beginner can finish one in a weekend.
- Slanted-back loungers put comfort first. The 10-degree and 15-degree cuts in one cutting list tell you the geometry is deliberate; get the angles wrong and the sit tips awkward.
- Cedar builds weather well but cost more. I would pick cedar only if the chair stays outdoors year-round with no cover.
- Pine builds run cheaper, around $20 in lumber per chair if you already own screws and glue. They need paint or sealant; one builder painted hers white against a brown house to keep them from visually disappearing.
Match the style to your patience for angled cuts and your budget for lumber.
What This Build Costs

A single pine chair runs about $50 in lumber, though that figure assumes you already own a drill, saw, and pocket-hole jig.
Cedar boards cost more and the difference adds up fast, so pine is what I would pick for a first build.
Paint or stain, screws, wood glue, and filler sit on top of that base number, and if you are starting from empty shelves the tool tab can push the real first-chair cost closer to $150.
The second chair gets cheaper fast; by the third you are probably under $60 each. For a renter or someone furnishing their first patio, that math matters more than the wood species.
Pine with a good outdoor finish holds up fine, and the savings against cedar leave room for cushions that actually make the chair comfortable to sit in.
Assembly Tricks That Save Time
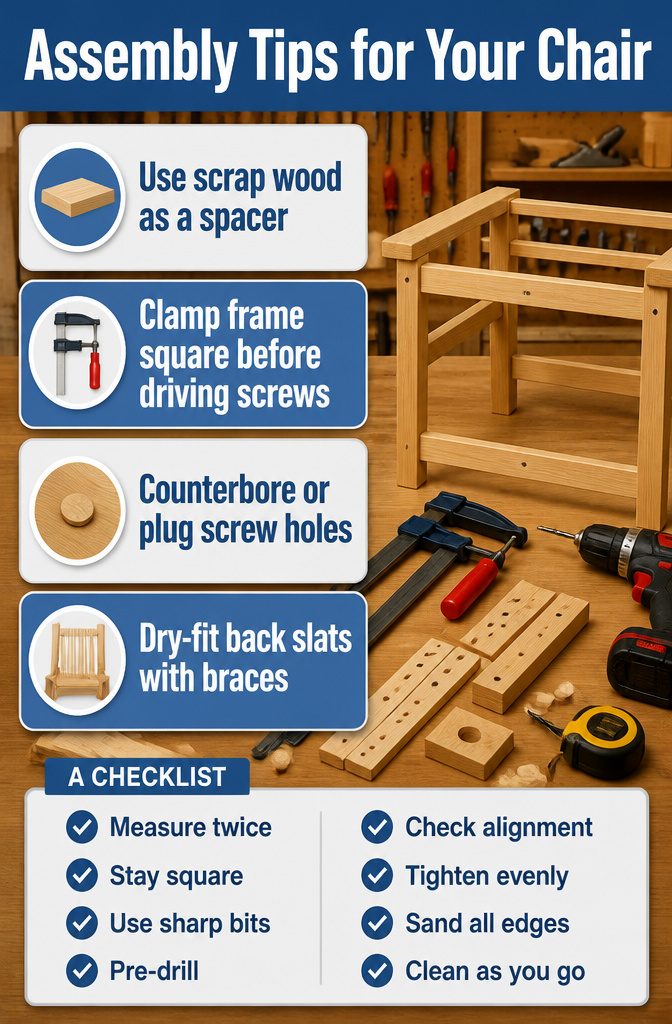
A few small habits during assembly keep the chair square and clean-looking.
- Use scrap wood as a spacer. A cutoff 1×3 or a strip saved from earlier cuts gives you a 3/4-inch gap between slats without measuring each time. For seat or back slats spaced at 3/8 inch, rip a thin spacer on the table saw and work with it in one hand, drill in the other.
- Clamp the frame square before driving screws. I check diagonal measurements corner to corner; when they match, the assembly is square. A single long clamp across the diagonals holds it there while I fasten the joints.
- Counterbore or plug your screw holes. Visible screw heads on the armrests and back slats read as unfinished. I counterbore slightly and set the screw below the surface, then tap in a dowel plug cut from the same lumber. Sand flush and the fastener disappears.
- Dry-fit back slats with temporary braces. Two loose 1x3s slid between the arm assemblies keep the sides upright and give the slats something to rest on while you align them. I flip the chair to fit the lowest slat, using the same trick from underneath.
Frequently Asked Questions
What type of wood is best for outdoor furniture?
Cedar is the best choice for outdoor furniture that stays in full sun and rain year-round, since its natural oils repel moisture and insects.
Untreated pine works fine for about $50 per chair if you seal it well with spar urethane and plan to reapply every couple of years. PVC lasts forever without refinishing but feels like plastic and needs specialized tools and fasteners.
How long should the seat slats be?
Seat slats typically run 22 to 25 inches long, depending on how wide you want the finished seat.
The overall chair width is 27 inches and the depth is 33-1/4 inches, so slat length lands inside that range based on how much frame you leave exposed.
Crosscut them last, after the legs and panels, so you can adjust if your exact frame dimensions shift during assembly.
What size cushions should I buy for my DIY outdoor chair?
Buy cushions before you cut any wood; standard sizes are 25×25 inches for the seat and 25×21 inches for the back, which most retailers stock.
If your cushion is 24×24 instead, build the seat width about a quarter inch narrower so the cushion stays put in wind.
Measure the actual cushion in the store rather than trusting the tag, since even half an inch off means a gap that catches your leg.