
Raised garden layout designs run from a weekend build with concrete blocks to a woven willow bed that takes serious time, and the right choice depends on whether you need maximum production or a specific look for your space.
A cold frame with a hinged polycarbonate lid extends your season in early spring, while a tiered pyramid bed packs more surface into a small footprint by stacking levels upward.
Before you commit, watch your candidate spot through a full day: 6 hours of direct sun is the floor for most vegetables, and afternoon shade from a fence or house wall will decide whether you are planting food or managing a shade garden.
1. Mix Flowers, Herbs, and Vegetables

A concrete block bed along a wall turns any narrow strip into growing space.
The blocks themselves form the border, so you are not buying separate edging. Marigolds tucked into the block holes give you pest deterrence without extra planters.
Before you start, check that the blocks sit level; a slanted row wobbles and gaps open. Cinder block leaches lime over time, which suits tomatoes and lettuce fine but can turn soil alkaline for acid-loving crops.
If your native dirt is already high pH, line the interior with landscape fabric or switch to a wood frame instead.
2. Trellis Planters

An A-frame trellis inside a raised bed doubles your surface without doubling your footprint.
Pyramid-style frames work best angled against the long side of the bed rather than centered, so you can still reach the back row for planting and harvest.
Tomato vines loaded with fruit need sturdy wood, thick enough to take the weight, or the frame bows by August.
Sink the legs deep into the soil or bracket them to the bed corners. A full trellis blocks morning or afternoon sun from the bed’s center, so plant lettuce or greens there, not peppers.
3. Raised Bed Gardening

Block-style layout means grouping plants in squares or rectangles rather than long rows, which changes how you move through the bed.
You reach from the path, never step on soil, so the bed stays loose and you weed only the planted squares.
Woodchip paths between beds, like the ones visible, cost little if your city shreds fallen trees and gives chips away free. I would lay them 3 inches deep over cardboard to suppress grass.
The fence in the background is doing real work here; if deer or rabbits visit your yard, a bed without protection is a salad bar. Wire mesh adds a solid chunk to the budget if you are starting from nothing.
4. Raised Garden Layout Pathways
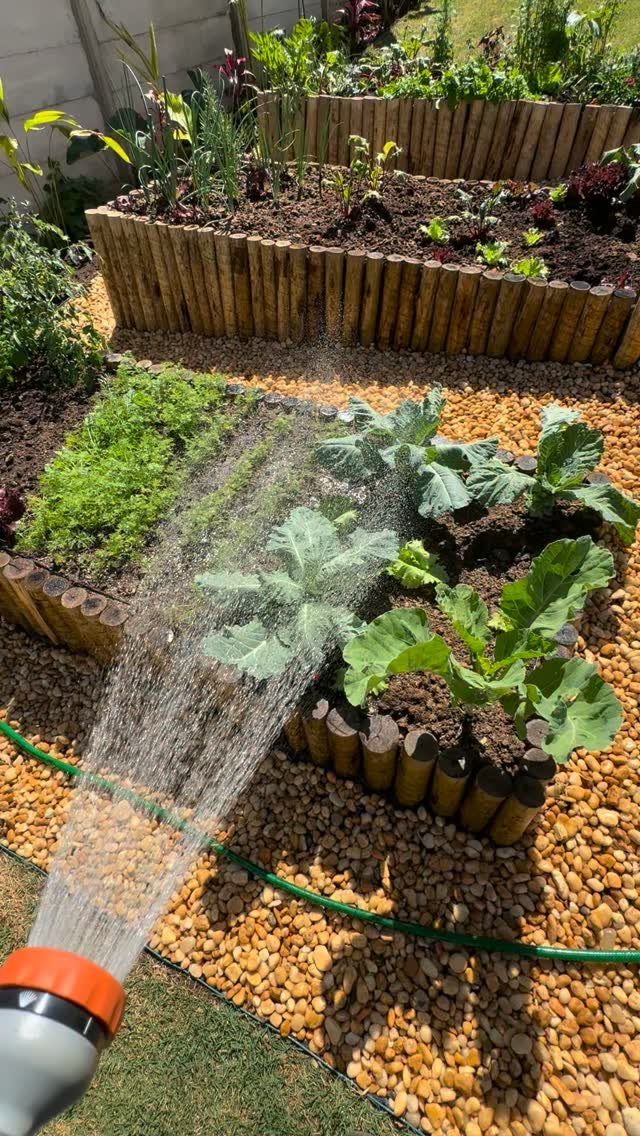
Pebble paths between log-edged beds drain fast and stay mud-free after rain.
Stand in the path with hose in hand; that width is what you need to work comfortably. I would plan 18–24 inches minimum, 30 if you want a wheelbarrow through.
Log edging rots eventually, faster in wet climates than dry ones. Cedar or black locust lasts longest; pine is cheap but soft.
River stone around 3/4 inch stays put underfoot; anything smaller migrates into the bed, anything larger rolls. Lay landscape fabric beneath or you will be weeding gravel in year two.
5. Natural Wood Raised Beds
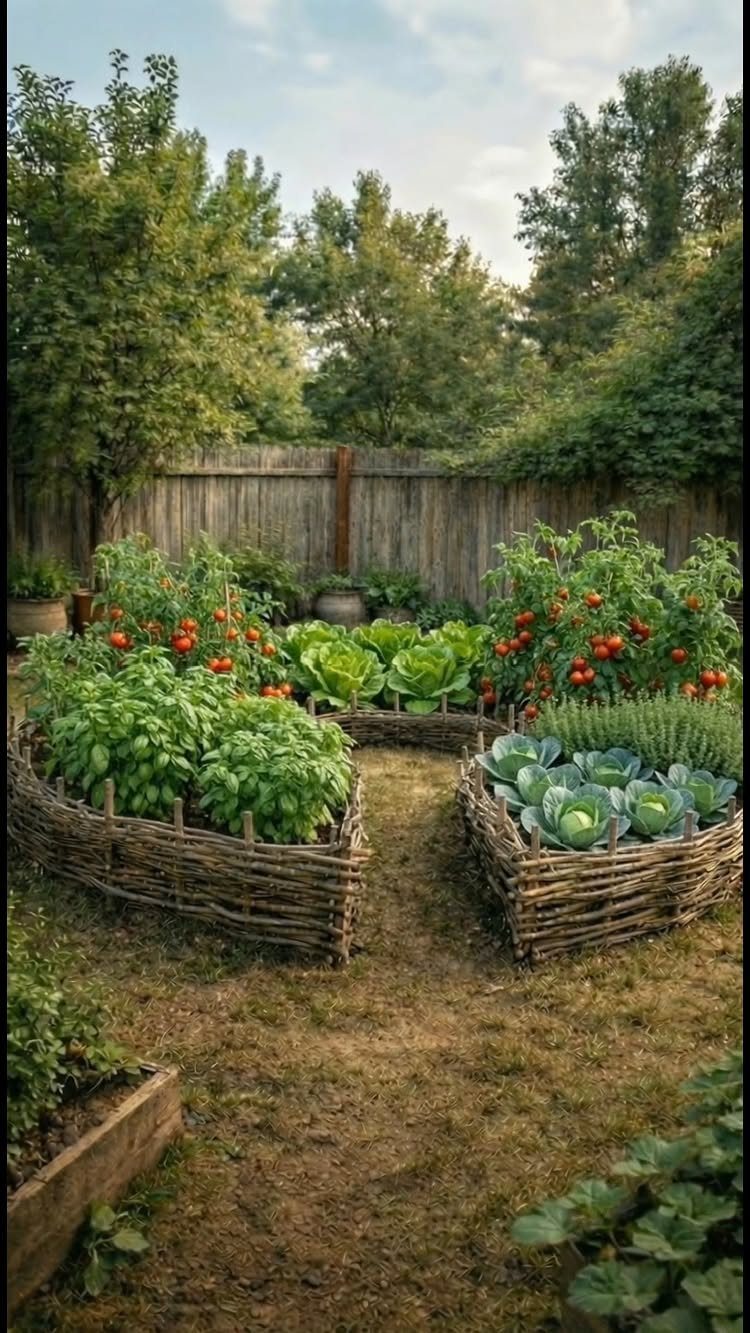
Woven branch beds, built keyhole-shaped, read as garden sculpture as much as growing space.
The technique is simple in concept: vertical stakes driven in a circle, then flexible twigs woven between them. Willow, hazel, or any green wood bends without snapping.
The catch is time. A woven bed takes serious time to build, and the walls slump some by season’s end as wood shrinks.
I would build these where I want the look, not where I need maximum production. For soil retention, line the interior with burlap or coir; gaps between twigs let fine soil wash through in heavy rain.
6. Multi-Bed Design
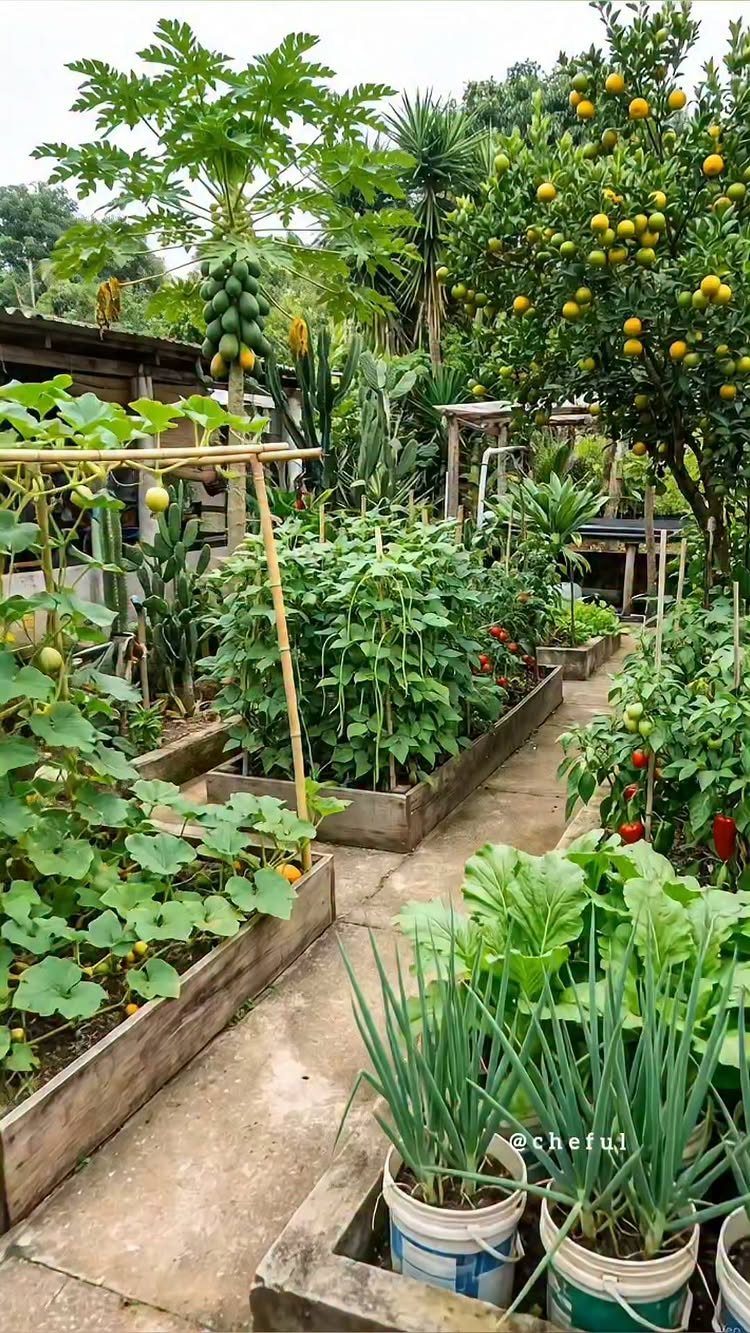
Multiple smaller beds along a concrete path let you rotate crops by bed instead of by section. Permanent plantings like papaya and citrus anchor the layout; annual vegetables move around them, breaking pest and disease cycles without a spreadsheet.
Smaller beds also mean smaller failures.
If one bed gets hit with blight, the others are isolated. The concrete path here is a permanent investment; for my budget I would use gravel or woodchip instead and spend the savings on soil.
Trellises appear in several beds, not all; I would limit vertical growth to the north side so shorter plants still get full sun.
Block style garden layouts (also called close-row or wide-row plantings) increase yields fivefold compared to the traditional row-style garden layout, and fifteen-fold for the smaller kitchen garden vegetables.
7. Cold Frame Raised Bed
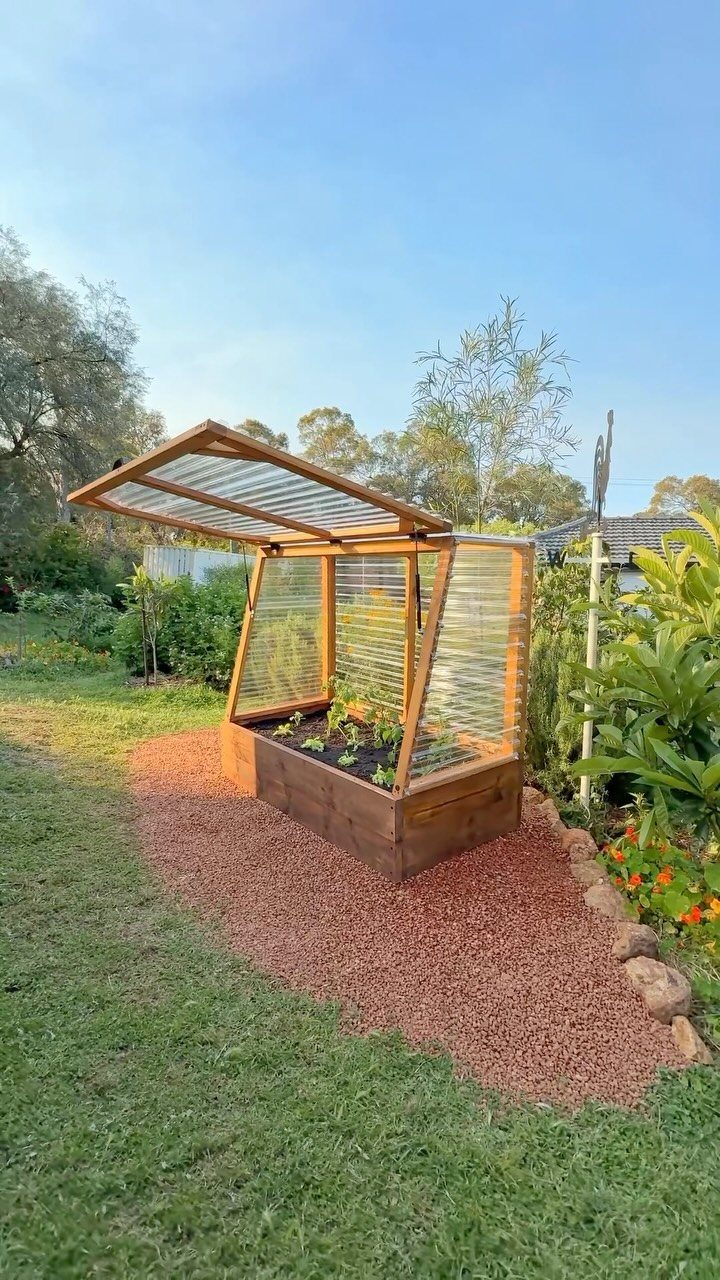
A cold frame is simply a raised bed with a hinged transparent lid you can prop open or close.
The lid traps warmth for seedlings started weeks before your last frost date, and the hinge lets you vent heat on sunny April days so you do not cook tender greens.
Before you build, check the slope of your yard. Water pools where the lid meets the frame, and a rotted sill is the usual failure point.
Gravel underneath beats lawn, so mud does not splash up every time you lift the lid. Glass is heavier and longer-lived than corrugated plastic, but it shatters; polycarbonate is my choice if kids or dogs share the space.
8. Tiered Wooden Raised Beds
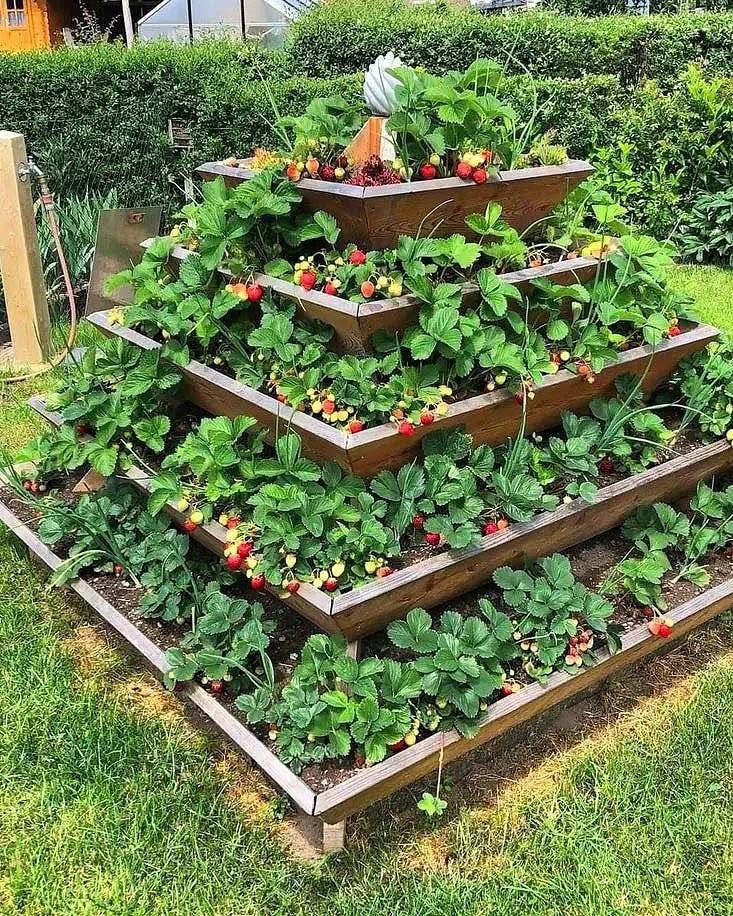
Tiered pyramid beds give you more planting surface in less ground footprint, which matters when your lawn is small or your sun hits only one corner.
Strawberries love the setup because fruit hangs over each level, staying clean and easy to pick.
The slope sheds water fast, so soil in the upper tiers dries out before the bottom.
I would fill every tier with strawberries, since the pyramid shape gives each plant its own pocket of sun and the drainage keeps the roots from sitting wet. Wood this exposed rots unevenly; the bottom tier always fails first.
If you are handy, line the interior with pond liner and punch drainage holes only at the lowest level. That buys a few extra seasons.
9. Corrugated Metal Raised Beds

Corrugated metal sides reflect heat, which warms soil faster in spring and can push cool-season crops along by a week or two. A white finish bounces more light than darker colors, a small help in partial shade.
The rolled edges on these beds are doing real work: raw sheet metal cuts like a knife, and I would not build or buy a bed without them.
Metal conducts temperature extremes, so roots near the edge bake in July and freeze harder in January.
A buffer of mulch or straw along the inside wall insulates without much effort. These beds are light enough to reposition, but once filled they stay put; plan your layout before you pour soil.
10. Rooftop Terrace Raised Beds
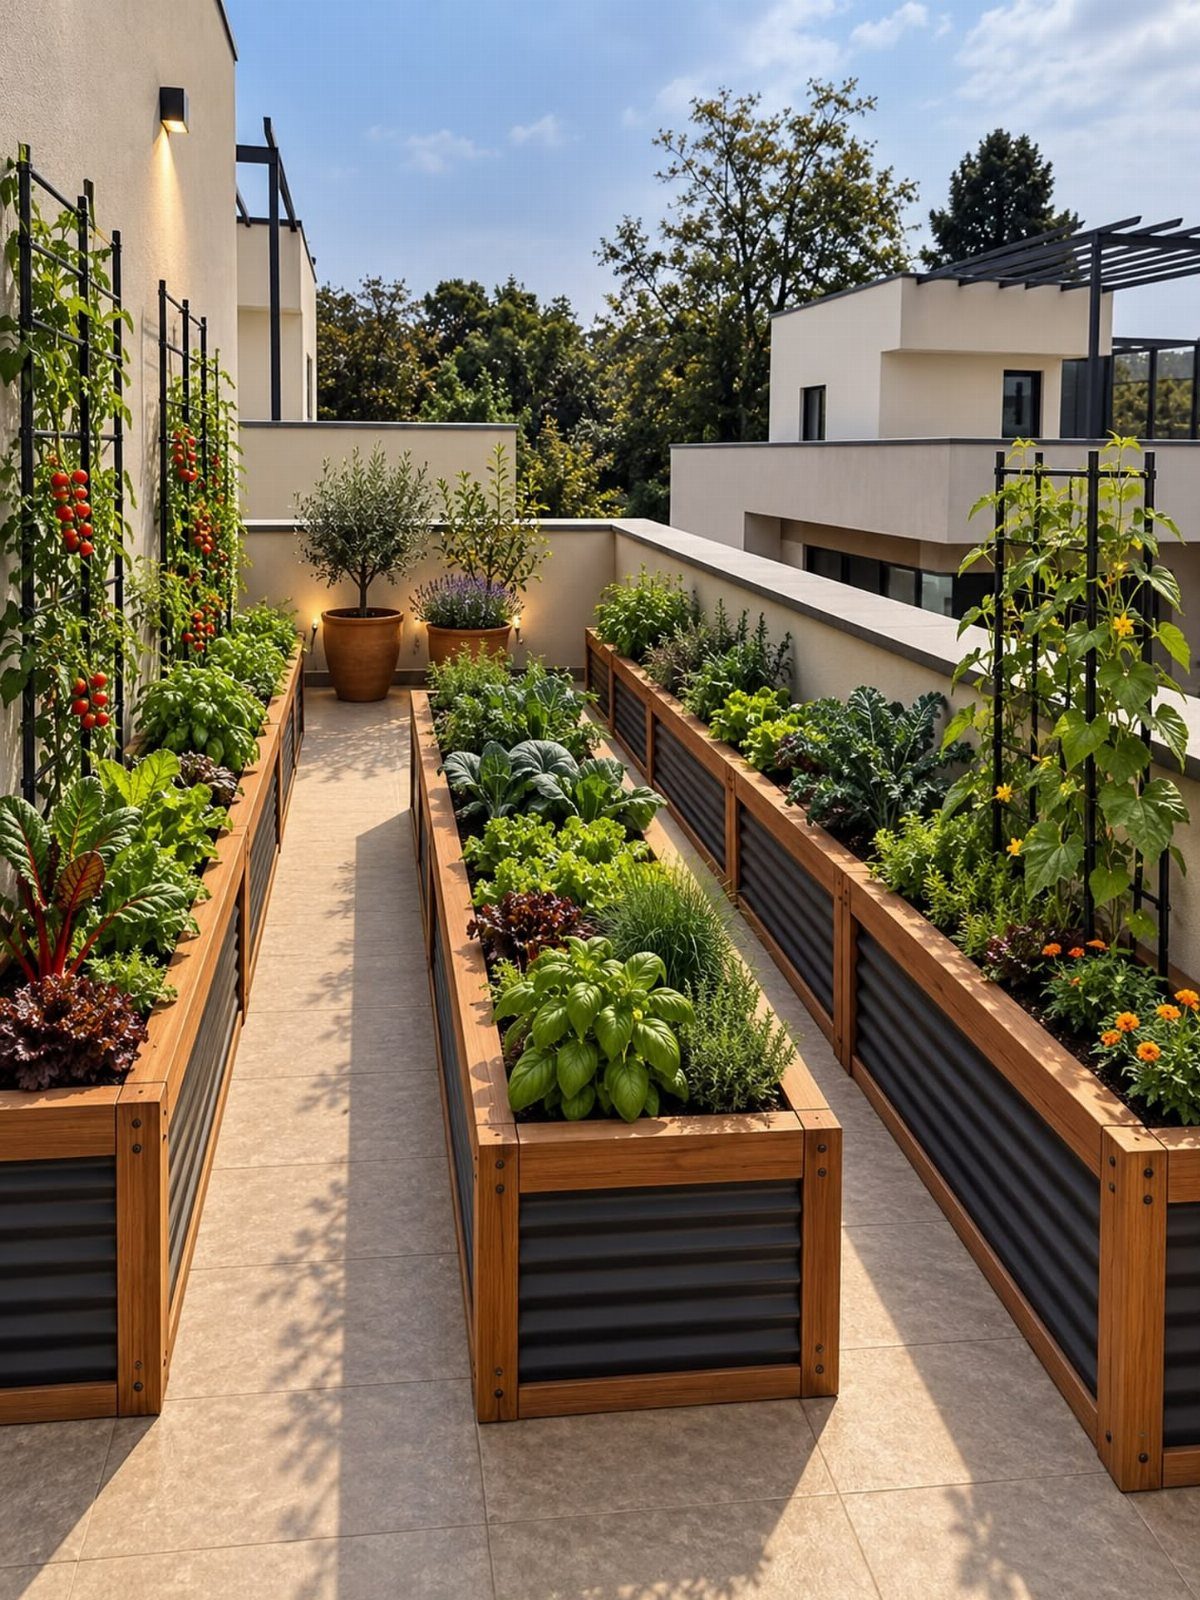
Rooftop beds sits on structure that was not built for dirt, so weight is the first thing to check.
Saturated soil is heavy, and a long bed like these adds up fast. I would confirm with a structural engineer before filling anything larger than a planter box, or stick to lightweight potting mix and shallow-rooted crops.
The wood trim here is not just for looks; it caps the metal edge and gives you something to grip when moving an empty bed.
Wind tears leaves and dries soil faster at rooftop height, so a drip line is worth the setup time.
The tile surface beneath drains well, which is good, but it also means no earthworms wander in. You are building a container system, not improving soil, so replace half the mix annually to keep nutrients available.
11. Square Foot Grid Raised Bed

A square foot grid turns any raised bed into a planting-by-numbers system. Each square gets one crop, sized to its mature spread, so you stop guessing at spacing and stop thinning seedlings.
The grid itself is the critical piece.
Permanent dividers keep you honest; string or twine sags and disappears by June. I would build or buy dividers that sit an inch above soil line, not flush, so you see them after mulch settles.
The system shines in beds you can reach across from the path, roughly an arm’s width or less. Wider beds mean a dead zone in the center, and the whole method falls apart.
Raised Bed Benefits
Raised beds give you soil control that in-ground planting cannot match.
You choose the mix, so sandy or clay-heavy native dirt stops mattering. Drainage improves because you are filling above the compacted layer, not punching through it.
The height also buys you time in spring. Soil in a raised bed warms faster than ground level, which means lettuce and peas go in earlier by a week or two.
For pest management, the elevation helps against slugs, and adding wire mesh or netting is simpler on a defined frame than across open ground.
From a layout standpoint, closed-bottom beds sit on concrete, decking, or any hard surface where digging is impossible.
That opens up side yards, patios, and strips next to driveways that most gardeners write off. 6 hours of daily sun is the threshold; below that, shift to shade-tolerant crops or skip food production for that spot.
Sunlight Requirements
6 hours of direct sun is the floor for most vegetables and herbs. Less than that, and you are managing a shade garden, not a food plot.
Before you set a single bed, watch the candidate spot through a full day.
Morning shade from an east-side tree clears by nine and may not matter; afternoon block from a fence or your own house wall is what kills productivity.
Side yards are the classic trap: they look usable, but tall fences and building shadows often leave them too dim for vegetables that need a full day of sun.
Orientation matters too. A bed running north-south catches more even sun than one aligned east-west, where the southern row shades the northern plants by mid-afternoon.
If your only sunny patch is narrow, that is where the concrete block bed against a wall or the trellis planter belongs. Do not force a wide layout into a slim bright zone and lose half your hours to shadow.
Watering Needs
Watering needs should drive where you place crops within a bed, not just which bed they land in.
Tomatoes and peppers want consistent moisture; rosemary and thyme prefer dry spells. Grouping them separately means you can soak one bed deeply and let the other drain, rather than averaging both into mediocrity.
In a square foot grid or block-style layout, this is straightforward: keep the thirsty crops in one zone, the drought-tolerant in another.
In tiered or pyramid beds, the upper levels dry first; that is where the herbs belong, not the strawberries that need steady water to fruit well.
Run separate zones or timer settings if your beds are close but their plantings differ. Match delivery to demand instead of watering everything on the same schedule and drowning half your plants while the other half dry out.
Frequently Asked Questions
How to make a garden bed in the ground?
I would begin with a single compact bed and add more only once I know how much growing space I actually fill in a season.
Wood, metal, brick, cinder blocks, plastic, or fabric all work; a modular kit lets you reconfigure or add sections later without waste. I would compare frame, soil, irrigation, and long-term upkeep costs before committing to a material.
What is the 70/30 rule in gardening?
The 70/30 rule suggests dedicating 70% of your garden to vegetables and 30% to flowers. I plant what I will harvest and enjoy rather than following any fixed ratio.
How to layout a rectangular garden?
Group plants in squares or rectangles rather than long rows, so you reach from the path and never step on soil. I would lay them 3 inches deep over cardboard to suppress grass and keep the planted squares loose and weed-free.
What is the 5, 4, 3, 2, 1 gardening method?
This method refers to spacing plants based on their growth habits and mature spread. That grid keeps you honest on spacing without thinning seedlings.